Here we have prepared the usage instructions which accompany our various products and accessories in digital format. If you are wondering how to use one of our components - details may be found here. If you cannot find the resources you are looking for, then please reach out and ask us here: info@britishmacheteco.com.
Instructions for using:
General Safety Notes
Using Your Blade Safely
BMC blades are made with the highest quality materials and craftsmanship. They are designed to last you for many years.
Your new blade is very sharp; use with caution. Here are a few safety tips to keep in mind:
• Your blade can cause serious injury or death if used incorrectly. Keep out of reach of children.
• If anyone is nearby, make them aware it is sharp and use with care.
• Before each use, ensure the sheath is in full working order and all bolts are tight.
• Keep a First Aid kit nearby when using the blade.
• Always wear safety glasses when chopping, splitting or otherwise using with high kinetic energy.
• Be aware of your surroundings and avoid tripping hazards.
• Sharpen the blade regularly. A sharp blade is easier to control.
• When clearing, keep your free-hand behind your back to avoid accidental injury.
• Never run with the blade unsheathed.
• When sheathing or unsheathing, ensure your ngers are clear of the cutting edge.
• If you drop the blade, ght the urge to catch it.
• Always store your BMC blade dry, clean and oiled in a sheath.
We hope you enjoy your new blade.
Sincerely,
The BMC Team
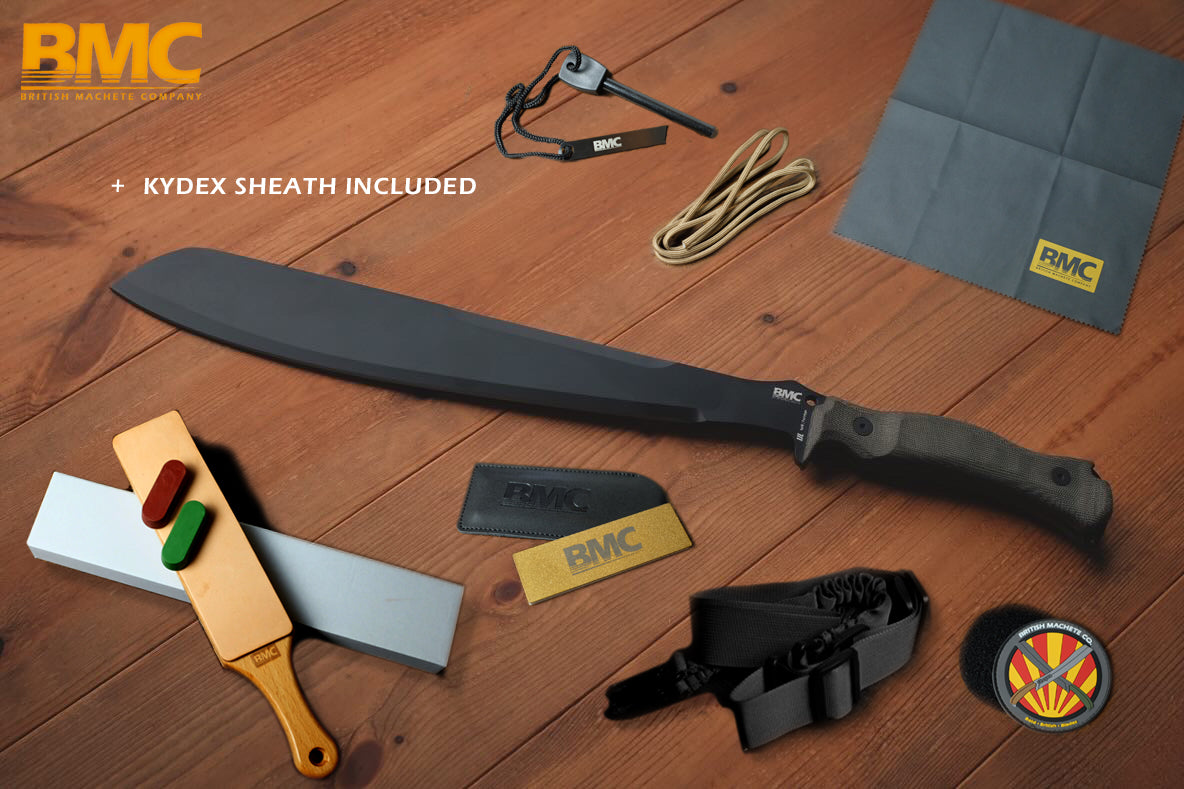
BMC Dual Grit Whetstone
Instructions for using the BMC Dual Grit Whetstone
Our stones have been made to offer an effective way to sharpen a blade without damaging it and maintaining its life.
The below instructions are intended to outline effective sharpening of a standard Sabre grind found on most kitchen, utility and outdoor-use knives and machetes. A Sabre ground blade is essentially one which has a main (primary) grind and a cutting edge (secondary) grind. It is the secondary grind which needs to be sharpened on both sides of the ‘V’.
The Dual Grit Whetstone consists of a fine grit side (White, #4000) and a medium grit (Green, #1000).
Use this side Green side first when the cutting edge is dull. If the blade is still relatively sharp but just needs a touch up, you can skip the coarser green side and move straight to the White #4000.
1. Place the entire stone into a sink of cold water and leave it submerged for at least 5 minutes. You will also need to keep some water nearby when sharpening to occasionally sprinkle a few drops onto the whetstone. This helps keep the whetstone moist and carries the loosened grit and steel particles off and away from the whetstones surface.
2. Set the stone on a flat surface, ideally around waist height if you are standing, or table heigh when seated.
3. First establish the correct sharpening angle of the blade. This can be done by using a permanent marker, felt tip pen or similar to colour the cutting edge. Draw the edge across the stone at the correct angle – confirmed by the removal of the marker from the entire surface of each side of the cutting edge. Check after each pass.
4. You will notice the marker will not be completely removed from the entire cutting edge in one pass. This is why repeated passes will be required for a properly sharpened blade – as explained below.
5. If the edge is in bad condition (blunt), establish the edge by pushing the cutting edge toward the stone, imagining you are slicing a layer off the stone usually ensures an effective angle. Do not use excessive pressure, but use your supporting hand to gently maintain even, downward pressure on the blade across the entire cutting edge.
For a longer blade start at the tip. You can hold the blade at an angle relative to the stone, so that each pass across the stone covers more cutting edge, rather than having the blade spine perpendicular to the stone. Do this five times each side, then four, three, two, one.
6. Next, we suggest drawing the cutting edge over the stone, away from the cutting edge (imagine spreading butter on toast). Keep the same angle established in point 2. Begin with 10 times away from you, 10 times spine towards you, then 9, 8, 7, 6, five, four, three, two, one each side.
*NB – If the blade has a curved tip (as many knives do) you may find raising the handle-hand elbow upward a few inches will keep the blades tip cutting edge angle consistent with the rest of the cutting edge being sharpened.
Your edge should now be nice and sharp, but perhaps still a little rough.
7. You can test the sharpness by slicing paper. A sharp knife should be able to slice cleanly across a normal sheet of paper without catching or sounding too ‘rough’. Try an ‘S’ shape cut. You can also lightly place the cutting edge on a thumb nail and see if it ‘bites’ into the nail without wandering. This would indicate it’s likely sharp enough.
Warning! Never slide your finger/thumb along a blades edge! You can run a fingertip across a blade to get a ‘feel’ for the sharpness.
8. If you want a more refined edge, then repeat step 5 above using the white #4000 side of the whetstone. Once finished, the cutting edge should be very sharp. Use with care.
If the cutting edge is still not very sharp do not panic! Take a break and come back to it. The most likely explanation is the sharpening angle wasn’t quite right. Attempt the marker pen on the cutting edge and slow down the sharpening strokes until the marker pen is removed consistently. Keep checking, go slow and you’ll start to pick up muscle memory of the correct sharpening angle.
After several sharpening sessions, you will notice the whetstones surface is no longer flat, but likely has raised edges. To flatten the stones surface once more, a fast and effective way is to find an area of pavement, patio slab or other hard, flat surface outside and work the uneven side of the whetstone back and forth and in circular movements until the stones surface is flat once more. Wash off any loose grit and it is ready to keep using.
The topic of sharpening has had whole books written about it! This is intended as a quick intro to get the best from your new whetstone and return your blades to full sharpness.
You may find the sharpening process described above very satisfying. For it to be effective, it does require several minutes of concentration and mild effort. If time is against you, we would strongly recommend coming back when you have more time, rather than using a less effective method, such as a ‘pull-through’ sharpening tool. Those items may appear to sharpen knives, but on a microscopic level, what they do is tear steel off the cutting edge and leave it jagged.
You will likely find our sharpening method described above an effective way at giving a longer sharp cycle to your cutting edge. It also removes steel in a more consistent and far less aggressive way; thereby extending the usable life of your blade.
Let us know if you need any more pointers and how you get on by contacting us here: https://www.britishmacheteco.com/contact
BMC Genuine Leather Honing Strop
The BMC Genuine Leather Honing Strop can be used daily to keep the cutting edge razor sharp.
The below instructions are intended to outline effective honing of a standard Sabre grind found on most kitchen, utility and outdoor-use knives and machetes. A Sabre ground blade is essentially one which has a main (primary) grind and a cutting edge (secondary) grind. It is the secondary grind which needs to be sharpened on both sides of the ‘V’.
The Leather Honing Strop consists of a quality FSC certified wooden paddle, affixed with two 3mm thick patches of genuine leather both rough and smooth. Each Strop is delivered with a Green (fine) and Red (medium) honing paste. These can be lightly smeared onto the respective leathers to enhance the honing effect on the blades cutting edge.
A Honing Strop is intended to be used on a fairly sharp blade that needs only a minor improvement in sharpness to make it incredibly sharp. It turns a fairly sharp edge into a mirror polished razor edge. Use the rough/red side first, moving onto the fine/green side to finish
1. Holding the strop in your less dominant hand, you will need to place the blade across the strop and draw it back and forth across the leather, ensuring you’re ‘spreading butter’ away from, not ‘slicing’ towards the leather as this will cut and damage the strop.
2. First establish the correct honing angle of the blade. This can be done by using a permanent marker or felt tip pen to colour the cutting edge. Draw the edge across the strop at the correct angle – confirmed by the removal of the marker from the entire surface of each side of the cutting edge. Check after each pass.
As stropping a blade can be done as regularly as desired without fear of removing too much steel each time and given the relative speed and ease with which a smaller knife especially can be stropped, you should find attaining a good angle is fairly easy when compared to sharpening on a stone. Crucially, a Machete and many utility knives will often benefit from a cutting edge which takes on a slightly convex edge. A happy coincidence of regular, free-hand honing with a strop.
3. For a longer blade start at the tip. You can hold the blade at an angle relative to the strop, so that each pass across the strop covers more cutting edge, rather than having the blade spine perpendicular to the strop. Draw the cutting edge over the rough/red leather, away from the cutting edge (imagine spreading butter on toast). Begin with 10 times away from you, 10 times spine towards you, then 9, 8, 7, 6, five, four, three, two, one each side.
*NB – If the blade has a curved tip (as many knives do) you may find raising the handle-hand elbow upward a few inches will keep the blades tip cutting edge angle consistent with the rest of the cutting edge being honed.
Your edge should now be nice and sharp.
4. You can test the sharpness by slicing paper. A honed knife should be able to slice cleanly through a normal sheet of paper without catching or sounding ‘rough’ at all.
Warning! Never slide your finger/thumb along a blades edge! You can run a fingertip across a blade to get a ‘feel’ for the sharpness.
5. If you want a mirror finish razor sharp edge, then repeat step 3 above using the fine/green side of the leather strop. Once finished, the cutting edge should be incredibly sharp. Use with care.
If the cutting edge is still not very sharp do not panic! Take a break and come back to it. The most likely explanation is the sharpening angle wasn’t quite right. Attempt the marker pen on the cutting edge and slow down the honing strokes until the marker pen is removed consistently. Keep checking, go slow and you’ll start to pick up muscle memory of the correct honing angle.
After several honing sessions, you will notice the strops surface may become shiny smooth with the pastes. We find freshening up the paste layer by reapplying a layer over the old paste helps keep the honing performance high.
The topic of honing is vast! These instructions are intended as a quick intro to get the best from your new strop and return your blades to full sharpness.
Let us know if you need any more pointers and how you get on by contacting us here: https://www.britishmacheteco.com/contact
BMC Dual Grit Pocket Stone
Instructions for using the BMC Dual Grit Sharpening Whetstone
Our stones have been made to offer a fast and effective way to sharpen a blade out in the field.
The below instructions are intended to outline effective sharpening of a standard Sabre grind found on most kitchen, utility and outdoor-use knives and machetes. A Sabre ground blade is essentially one which has a main (primary) grind and a cutting edge (secondary) grind. It is the secondary grind which needs to be sharpened on both sides of the ‘V’.
The Diamond (gold) side of the stone is a higher grit, ideal for putting a new edge on a blade. Use this side first.
1. It is best to set the stone on a flat surface. Securing it in place to prevent movement is best where possible.
2. First establish the correct sharpening angle of the blade. This can be done by using a permanent marker, felt tip pen or even some fine mud (if outdoors) to cover the cutting edge. Draw the edge across the stone at the correct angle – confirmed by the removal of the marker from the entire surface of each side of the cutting edge
3. You will notice the marker will not be completely removed from the entire cutting edge in one pass. This is why repeated passes will be required for a properly sharpened blade – as explained below.
4. If the edge is in bad condition (blunt), establish the edge by pushing the cutting edge toward the stone, imagining you are slicing a layer off the stone.
Start at the tip and for a longer blade, you can hold the blade at an angle so each pass across the stone covers more cutting edge, rather than having the blade spine perpendicular to the stone. Do this five times each side, then four, three, two, one.
5. Now we suggest drawing the cutting edge over the stone, away from the cutting edge (imagine spreading butter on toast). 10 times away from you, 10 times spine towards you, then 9, 8, 7, 6, five, four, three, two, one each side.
*NB – If the blade has a curved tip (as many knives do) you may find raising the handle-hand elbow upward a few inches keeps the blades tip cutting edge angle consistent with the rest of the cutting edge being sharpened.
Your edge should now be nice and sharp, but perhaps still a little rough.
6. You can test the sharpness by slicing paper. A sharp knife should be able to slice cleanly across a normal sheet of paper without catching or sounding too ‘rough’. Try an ‘S’ shape cut. You can also lightly place the cutting edge on a thumb nail and see if it ‘bites’ into the nail without wandering. This would indicate it’s likely sharp enough.
Warning! Never slide your finger/thumb along a blades edge! You can run a fingertip across a blade to get a ‘feel’ for the sharpness.
7. If you want a more refined edge, then repeat step 5 above using the white ceramic side of the stone. Once finished, the cutting edge should be very sharp. Use with care.
If the cutting edge is still not very sharp do not panic! Take a break and come back to it. The most likely explanation is the sharpening angle wasn’t quite right. Attempt the marker pen on the cutting edge and slow down the sharpening strokes until the marker pen is removed consistently. Keep checking, go slow and you’ll start to pick up muscle memory of the correct sharpening angle.
The topic of sharpening has had whole books written about it! This is intended as a quick intro to get the best from your new stone and return your blades to full sharpness.
Let us know if you need any more pointers and how you get on by contacting us here: https://www.britishmacheteco.com/contact
BMC Firesteel Ferro Rod (with Striker)
Instructions for using the BMC Firesteel Ferro Rod (with Striker)
The BMC Ferro Rod is an excellent blade accessory; providing sparks in challenging conditions.
Firesteel, also known as Ferrocerium is a synthetic alloy that is highly pyrophoric (capable of igniting spontaneously in air). During the striking process small shavings are removed at high speed, this oxidizes very quickly in contact with the air, the heat of the friction ignites the oxidized shavings and the burning metal is the spark.
Each firesteel will last for thousands of strikes if used correctly, so they are by far much cheaper than lighters or matches, and they will work faultlessly in any environmental conditions. Simply strike the rod with the steel scraper provided, or the back of a blade to create a hot shower of fire lighting sparks.
The BMC Ferro rod will not be affected by rain, cold, snow, extreme heat, or even submersion in water. So the versatility of this accessory means it deserves a spot in everyone’s hiking, camping and bug-out bag.
They can also be used to light gas or alcohol stoves and bonfires! A great accompaniment to any outdoor adventure.
Let us know if you need any more pointers and how you get on by contacting us here: https://www.britishmacheteco.com/contact
BMC Shoulder Sling Strap
Instructions for using the BMC Shoulder Sling Strap
The BMC Shoulder Sling Strap keeps all larger BMC blades slung comfortably and ready for instant deployment.
If you get a BMC blade with a Kydex sheath, it will have a very sturdy belt Dangler rig made of sturdy leather and a heavy duty steel D-ring. This allows for the machete to be carried on either side of the belt. Although perfect for several hours of carry, the longer, more daring expeditions may benefit from a shoulder carry option. Enter the BMC Shoulder Sling Strap.
It can be slung over the neck or carried off one shoulder. It offers multiple adjustable buckles, two elasticated sections and heavy duty quick-release hooks for fast coupling/uncoupling to a sheath. The strap is also strong enough to have other accessories attached if so required.
When sold separately; the BMC Shoulder Sling Strap comes with one mounting assembly which is very easy to mount through a standard 6mm Sheath rivet, as used on our sheaths. You will need a 2.5mm Hex head screwdriver or Allen key. The remaining Strap hook is best attached to the top of the sheath via its inbuilt heavy-duty D-ring.
The BMC Shoulder Sling Strap is available in Black or Army Green.
Let us know if you need any more pointers and how you get on by contacting us here: https://www.britishmacheteco.com/contact
Featured collection
-
BMC Bronze Union Jack Bead
Regular price £10.00 GBPRegular priceUnit price per£10.00 GBPSale price £10.00 GBP -
BMC Akimbo Morale Patch
Regular price £5.00 GBPRegular priceUnit price per£5.00 GBPSale price £5.00 GBP -
BMC Leather Strop Paddle with Pastes
Regular price £28.00 GBPRegular priceUnit price per -
BMC Firesteel ferro-Rod
Regular price £8.00 GBPRegular priceUnit price per£10.00 GBPSale price £8.00 GBPSale


